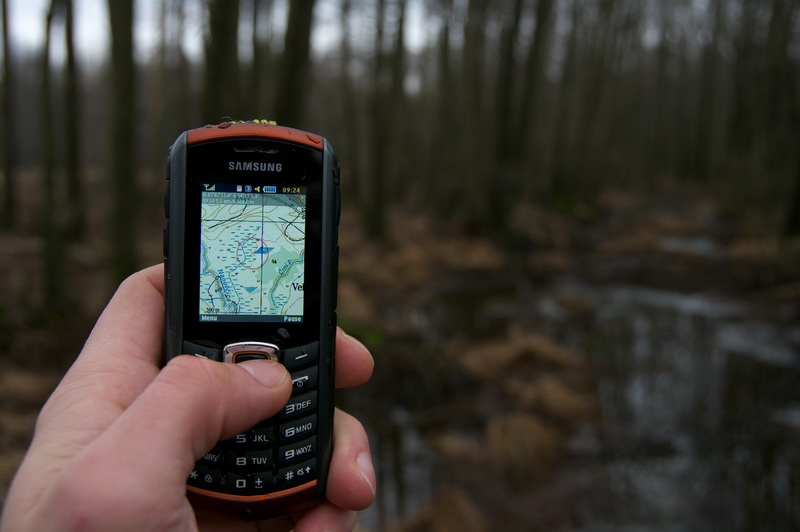
Using GPS on a phone
 Many of us have a cell phone with a GPS receiver. Unfortunately most phones just feature a GPS receiver and don't make good use of it. That was also the case with my firs phone featuring GPS that could only show coordinates of current position. That could help when calling for help lost in forest and that's pretty much it. Well I must admit that the phone has Google maps but it has poor functionality and it requires connection to internet which means additional costs and it becomes useless in remote areas without signal. Luckily situation isn't so murky.
Simple cell phones have support for Java and there are many free and payable GPS applications on the world wide web. I tried many of them but only two remained on my phone. Namely GPSMid for routing and TrekBuddy for just about everything else. The latter is especially useful for cavers. It allows geo caching, saving tracks, navigation towards a position, one can create atlas for a desired area from online sources (Openstreetmap, Yahoo, Google...) It doesn't download any data from internet (works also in "Airplane mode"), it's also available for Android and it's free. A memory card is recommended (4GB+).
So if you have a phone with obsolete Java games, and GPS receiver feature and you'd like to make it in to a very handy GPS device (and you can spare 10€ for a memory card) read on.
Top - Installation - Basics - Positions - CMS - Tracks - Conclusion
Installation
This user manual is written based on my experience with TrekBuddy on Samsung B2710. Installation could be slightly different on other phones but basically the same. Using Trekbuddy should be the same on all phones.
- Download TrekBuddy application
- Save .jar and .jad files on memory card that's in your phone
- Run trekbuddy.jar file and allow installation
- a) After installation you'll be probably asked if you want to run application. Answer is yes.
b) If you weren't asked to runt the application, you'll probably find it in "Games and more" or something like that. Run it. - You'll be asked to allow TrekBuddy reading/writing. Select "Allow, ask once" or something like that. (Further more you'll be asked a couple more questions like that. The answer is always the same.)
- Trekbuddy is installed and running. First you'll be asked if it can create Trekbuddy folder. The answer is yes. (application created "Trekbuddy" folder with several sub folders on memory card.)
Top - Installation - Basics - Positions - CMS - Tracks - Conclusion
Basic functionality
TrekBuddy is installed and running. A small map of the world is displayed. For anything more a so called atlas is needed. Atlases can be made with Mobile Atlas Creator. I've made a small atlas to save you the trouble. It doesn't have bigger magnifications but is adequate to get acquainted with Trekbuddy. Unfortunately it's useless for live test outside Slovenia. Still interested? Read on.
- Download SLO_OpenStreet_2012-01-13.zip (240MB) In the zip file you'll find folders "SLO Cycle" and "SLO MapQuest". Copy (unpack) those folders in folder "TrekBuddy/maps" on memory card.
- Run Trekbuddy on your phone again and again you'll see a small map of the world. Move the cross-hair on Slovenia with navigation keys or keys "2, 4, 6, 8" (single press moves cross-hair for one pixel, long press scrolls the cross-hair). If you have atlas covering different are than move the cross-hair to that area.
- Select "Menu/Settings/Desktop" and set "Easy zoom" to "Layers". Then select "OK" and then "Save".
- Select "Menu/Maps" then folder "SLO Cycle" or "SLO MapQuest" and then "Atlas.tar" (at the bottom). "Cycle" and "MapQuest" two types of maps.
- C
 ontent of atlas is displayed. In our case that is:
Cycle 07......Cycle 13
or
Mapquest 07....Mapquest 13
"Cycle" and "MapQuest" are two types of maps, "07-13" are magnifications. One grade of magnification means twice the size of a map.
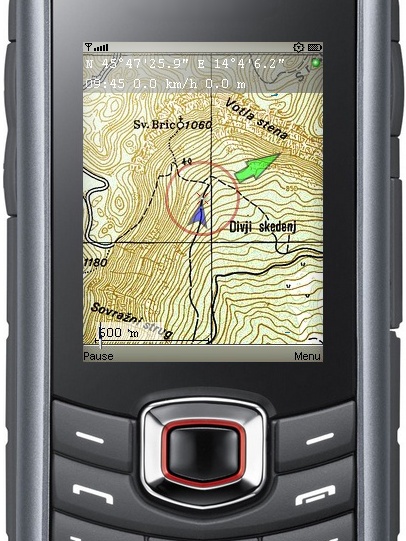
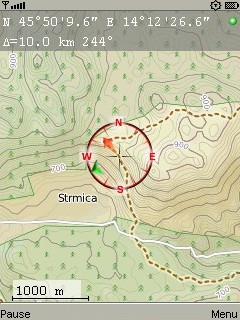
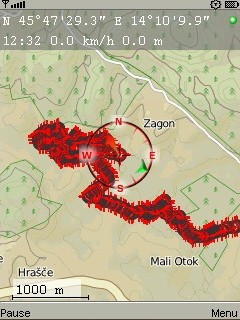
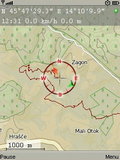
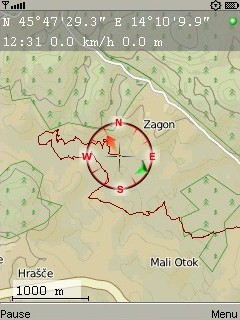
Select magnification 07-12 (because they're in one piece while magnification 13 is cut up for easier loading. On pictures to the right you can see magnification 12). To zoom in press key "9". To zoom out press key "7". To change map type load different atlas (step 4). - If you want to see where you're at (presuming that you're outdoors and in Slovenia) select "Start" or "Menu/Start" and application will start searching for GPS signal. The red dot in the upper right corner will be blue while searching for GPS and will become green when GPS signal is found. If the signal can't be found the dot will become yellow

- Now that the phone is receiving GPS signal a red arrow
 will be displayed in the cross-hair. This arrow shows course direction of movement. If you move around enough (walk/drive) a map will also move and center on your position. If you move just the cross-hair (navigation keys or keys "2, 4, 6, 8") the course arrow will disappear as the cross-hair is no longer on actual position. To place it back on current position press the middle key (in between navigation keys) or key "5".
So much for basic functionality. Now you can check your position with Trekbuddy and see what's on the maps. The phone won't download any data or even need GPS signal. Maps in atlas can of course be more detailed but will also require considerably more space. Atlas of Slovenia containing made of Google maps up to magnification 15 takes 390MB, terrain 650MB and earth 815MB. You can download Google atlases bellow and you'll need a software that can handle zip files (7-Zip)
- Roads: SLO_Maps_2013-04-22.zip (390MB)
- Terrain: SLO_Terrain_2013-05-24.zip (650MB)
- Satellite: SLO_Earth_2013-05-24.zip (815MB)
Top - Installation - Basics - Positions - CMS - Tracks - Conclusion
Saving and finding positions
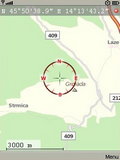
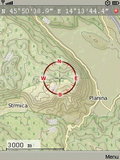
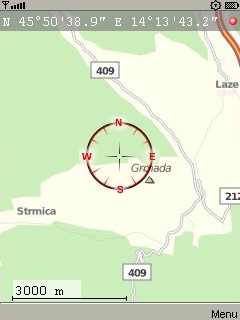
TrekBuddy works in three modes: map layout, compass and CMS. To switch between modes press key "#". We got familiar with map layout in previous chapter, digital compass is useful for navigating toward a destination. and CMS (content management system) displays various data such as average/maximum speed, number of satellites, traveled distance...etc. You cane read more about CMS later on. In next steps you'll need just map layout and digital compass.
As a caver you're probably interested in finding and recording position. Let's say you want to join a caving camp on an unfamiliar terrain and your friend sent you the coordinates.
Saving custom position
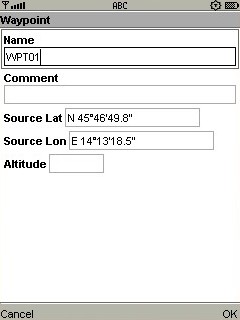
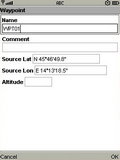 So you have GPS coordinates of camp. Set Trekbuddy in map layout. Select "Menu/Navigation" and "Add Custom Waypoint". You'll see an input form with coordinates of current cross-hair position.
- Input the desired name (if you don't have delete key "C" start input with long press on key "#"),eventual comment and coordinates (Source Lat, Source Lon). You can input coordinates in decimal (45,780498505 14,221805573) or degree (45°46'49.8" 14°13'18.5") format. Altitude isn't' necessary.
- Select "OK". You'll see a list of .gpx files. Select one of the files if you want to save in existing file or select "<new file>" at the top of the list to create new file.
 a) If you chose existing file go to step 5.
b)If you chose new file you'll be offered a name based on date "User-yyyymmdd-hhmmss". You can of course change this name. When you're done writing select "OK". A .gpx file is created containing position of caving camp. You can add additional positions in this and other .gpx files.- Now that the file is saved you'll find your self in the "navigation" menu. It would be wise to check the position you just entered on the map. Select "Waypoints" and file where you saved position of caving camp. Select caving camp position and then "Menu/Go To". Position of caving camp is now indicated with cross-hair on a map (presuming that it's on area covered by atlas)
Saving current position
If you want to save a position on terrain (perhaps a cave you just found) follow the above procedure with one exception: in step 1. select "Add GPS Waypoint" (instead of "Add Custom Waypoint")
Finding position (navigating)
 In order for Trekbuddy to direct you towards caving camp you must set it as destination. Select "Menu/Navigation" and "Waypoints". Select .gpx file where caving camp is saved and select it's position. You'll see data of caving camp. Select "Menu/Navigate to".
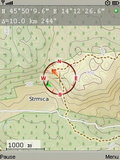
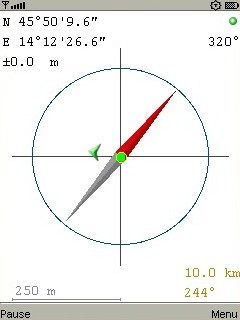
- A map is displayed with cross-hair, red arrow showing course direction and green arrow
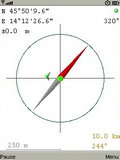
 pointing towards destination. Under coordinates at the top of the screen you'll see either azimuth and distance or speed and altitude. You can switch between the two with key "5" or middle key. (GPS must be active and cross-hair set at current position (key "5" or middle key)
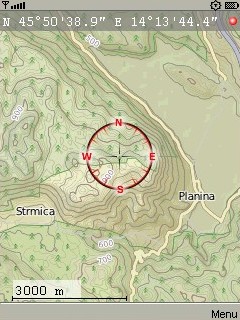
 - While walking towards the caving camp you can check digital compass where vertical up is aligned with your course and green arrow points at destination. If you're moving around you'll also see a trail of green circles. Think of them as your footsteps. Orientation of compass needle (north/south) is calculated from GPS data of your movement and is not as steady and precise as magnetic compass.
- In digital compass you can switch between night and day mode with key "0", change scale with left/right key or "4,6", enable/disable interpolation with up-down key or "2,8" and lock/unlock compass orientation with middle key or "5".
Now you can find that caving camp and if you happen to find new caves you can save their position.
Top - Installation - Basics - Positions - CMS - Tracks - Conclusion
CMS
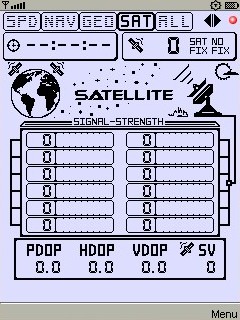 Acronym CMS means Content Management System and is besides the fore mentioned map and compass third mode of Trekbuddy. As name suggests this mode displays data such as maximum, average speed, number of satellites and signal strength etc. What CMS displays depends on theme being installed. The recommended theme For Samsung B2710 and other phones with screen resolution of 240x360 is digiblue(240x270).zip. You can find themes suitable for other screen resolutions here.
- Unpack content of zip file in the "trekbuddy/ui-profiles" folder on memory card in your phone.
- Run trekbuddy and switch modes with "#" button until you reach CMS mode. Pressing the key "#" cycles modes in following order: map->compass->CMS->map...
- In CMS mode you can press left/right or buttons "4/6" to switch between displaying various data (if theme allows it)
- With key "0" you can switch between day and night mode (if theme allows it)
Top - Installation - Basics - Positions - CMS - Tracks - Conclusion
Recording track
 Another useful function of most GPS devices is recording track. It can be handy in mountains so you can backtrack to camp even in fog or night. It could also be used to record uncharted footpaths (your friend from previous chapter could give you a .gpx file with track from parking spot to camp). TrekBuddy can draw trail as you move along and/or save track.
- To draw trail you need to enable "show trail" in "Menu/Settings/Desktop". This trail will remain on screen only as long as Trekbuddy is running.
- To save track you need to select "Menu/Settings/Location" and enable "Tracklog •ask"
- From now on TrekBuddy will ask you if you want to "Start tracklog?" each time you start GPS. In case you decide to record track a .gpx file named after date and time (yyyymmdd-hhmmss.gpx) is created.
 You can load saved track by selecting "Menu/Navigation/Tracks" and choosing track file. Track points will be listed. Select "Menu/Route Along" and track will be drawn on map with navigation arrow aiming at starting point of track.
- Displayed track might be cluttered with POI icons at each corner of track and their labels. To hide/show labels press key "0". To hide POI icons select "Menu/Settings/Navigation" and disable "POI icons" so that a track is drawn only with a line.
Top - Installation - Basics - Positions - CMS - Tracks - Conclusion
Conclusion
 We learned some functions of TrekBuddy. If you browse through menus you'll find many options and settings that TrekBuddy offers. I'd like to emphasize two of them
- In "Menu/Settings/Misc" there is an option "Lowmem I/O", that should be enabled if your phone can't load bigger maps due to insufficient memory.
- in the same menu there is also "numeric input hack" that should be enabled if your phone is without delete key "C".
You can find extensive user manual on Trekbuddy wiki.
Limitations of Trekbuddy have to do with fact that it uses raster maps. That means it can't read any data from maps and thus can't search for places by name, find routes, etc. (For routing on Java phones I recommend GpsMid)
P.S.
TrekBuddy is free, but if you find it useful I encourage you to make a donation on Trekbuddy pagei ("make donation" top right)